Friday 27 April 2012

Shop update

Got my first proper letter at the shop today - the water rates!!!  - Welcome to shop life.

I edged all the windows with grey gloss - I really hate gloss work - but it had to be done.  It is much better- needs a second coat to finish it though.

Cleared the rubbish pile - 4 bin bags of rubbish they left me - and loads of really pretty new mugs which we can use though.  Then got the window all sorted - wood in and a couple of coats of paint.  Made up a sigh so people can see it's a new shop coming


I finished the back room - scrubbed the counter top and steamed the floor - now it is getting serious - started moving stuff in.

The old goat has been building my work bench this afternoon - came home and left him to it - quick bit of dinner to get ready.  The is a dog show tomorrow - I have decided not to go but hubby is - so no work on the shop.  Got to keep up wih my regular stuff

Sunday - the Art On The Prom season at Grange Over Sands starts - so we will both be out working there

Yours
kitten xx

Thursday 26 April 2012

Shelly's Images - Honey Bee - How does your garden grow

Shelly's Blog - HERE
Shelly's Images shop - HERE
This is a bit different - a real looking bee.  There are so many cutie cartoon bees about it's nice to see a real one - and I just love the wings.
I took the theme a bit literally - and I made a flower pick to sit in a flower pot.  The bee is more greys than black- and the flower is lilac (BG Copic).  I painted the wings with shimmer H2Os and added glitter on the flower.  The 'stem' part is actually an olive pick.  I get these in my Graze box and religiously save them away until I find a use for them.  Guess I have found it now!


Do join us with this weeks challenge on the BLOG
Yours
kitten xx

Do You /stack Up? #69 - DT inspitation

Welcome back for another round of fun! Did you guys have fun with the Stripes challenge last week? It's time for another challenge and this week we're asking you to CASE the D.T!

So, take some inspiration from our talented team, colours, sketch, themes, style, however your inspiration takes you! Of course, if you take inspiration from us, we love to hear from you, so make sure to stop by your D.T. inspiration this week and leave her some love :-)


We have three amazing sponsors this week:

Little Darlings - $10 Gift Certificate


A Day for Daisies - $16 gift certificate


The Paper Shelter - $20 Gift Certificate


A FEW RULES
  • Our DT would love to leave comments on your blogs, please remove word verification to make this process easier (see right side bar for a how-to guide).
  • Only 3 entries per person per Challenge.
  • Make sure to link back to this challenge and mention it on your blog in your blog post.
  • No back linking.
  • Entries that do not fit the requirements will not be eligible for Winner or Top 3.
  • Mr. Linky closes at 2pm on Wednesdays.

This week you will have to bear with me - I have set this all up to run - while we are opening the shop.  Sooo exciting - and of course - photos will follow when we get all the systems up and running.
My image is from The Paper Shelter - Executive Woman.  Love it for a modern new job card.  I am really pleased at how this turned out.

The inspiration I want to pass on to you - is layers of paper.  Rummage through the old scraps and find loads of bits that go together - make a card WITHOUT cutting into a new piece of paper.  The papers are all odd ments - they are even matted onto matching oddments - love it!

Yours
kitten xx

Wednesday 25 April 2012

Scrapper's Delights

EEEEEEKKKKKKK

Come home for a couple of days to catch up with the bench work - and blogger is all different. - Scary :-0 - is it better?  It will take me a few days to find where everything is now.

Anyway - shop update.  Sooo sick of the smell of paint and desperate for a bath - so I have come home for a couple of days to catch up on 'my other life'.  The shop is looking super.  All the walls and the ceiling have had a good coat of white - and most of the walls have had 2 coats.  The kitchen / back room is all done - the walls are white and the kitchen units are Dove Grey (to match the other furniture).  I have scrubbed and sanitised out the fridge and microwave - and given the floor it's first good scrub.

The window now has it's proper display space - ready to paint - and the window frame and door have had the first coat of grey.


How cool is this?  - this is one of several of the original beams left exposed.  I just love it - imagine if it could tell a story.  There are loads of these - plus a huge big roof beam that is original - and an amazing little ingle nook over the back room door.

The next biggie is building my work bench.  I can't fully move the wrokshop over until I have proper working space there.  I am hoping that the old goat will be able to fit that in Thursday or Friday.  We are out working all weekend - Grange Art show starts for the season.  So it will be next week before we can start to get the furniture in.

I am going to have a really restful day tomorrow and try to catch up on a bit of rest - and my blog posts for next week.

More to follow
Yours
kitten xx

Tuesday 24 April 2012

Tuesday - Shelly

This weeks post has been hijacked by Shelly's images for their tutorial (probably just as well considering the mess round here!!!!)

OK - I am going to share with you the secret of my fave little tote bags.  I use these loads (this is what the Grasmere Gingerbread wedding favour bags is based on (but made to fit the gingerbread slices - shhhhh)
FIRST - slice a 4" section off a double sided scrapbook paper.  Make it a decent weight - but not too thick as that tends to crack
Score at 4" - 5" - 9" - 10"  - just love these scoring boards - makes it so much easier.  You have to remember that sometimes I have to make a batch of 100+ for the weddings


And the score at 1/2" - 3"


So - now you have your basic template lined up - you need to cut a V at the base (the larger section) - so the bottom tucks up neat

You also need to trim off the top and bottom of the SMALLER section that is going to wrap around and make your bag - so that it sits neat


The smaller section of the long side is the top - and needs to be tucked under before you shape the bag round

Make sure you give it a really crisp fold - then the corners will be neater


Next you tuck your bottom (painless - I promise).

 Fold the shorter narrow sides in first - then layer the longer front and back over them.

Tiny tip - I use PVA glue for the base - yes - as fiddle - but it's a stronger bond

Punch a couple of holes on each of the longer sides and tie a loop of ribbon for a handle - I use about 91/2" for each side - but I am on a budget - a good 12" will make a lovely long handle.

Than just have a ball adding an image!

You can adjust the side measurements to suit what ever you need - and make it deeper if you wish - but I just love this dinky little size


Yours
kitten xx

Monday 23 April 2012

Day off

Monday is kitten's day off
This is one someone sent me - if you want to join in and share email me an image
Yours
kitten xx

Sunday 22 April 2012

Ester Gundry

I did a workshop with Ester Gundry this week - it is the second time I have worked with her - and I just love it.
She brings you the project you will be doing - and loads of bits - and basically says 'here's the toys - go play'.  It is so great to be given a free hand to discover things for your self - I have done classes where we have had to do exactly as we are told and I don't think you really learn things that way.  It is so much better to have the encouragement to try different stuff.

We made a card - a decorated canvas - and a candle.  Ester is much more into die cuts than I can do - she is a demonstrater and has tons - I am more into image and mixed media.  What we both share is a serious love of inking - distressing - embossing - and layering.
So this post is for Ester - what I did when I got home. 

 After raiding The Works for canvas blanks

Not bad for a first time all by myself - and yes - I did make the rosettes!

and a candle - can't beliefe I actually did it and it worked.
I didn't have any cellophane to wrap the caldle in - so I cut the top of a DL card bag in a pretty pattern and used that - perfect
Thanks Ester - see you in June
Yours
kitten xx

Saturday 21 April 2012

More of the song

This is another couple of cards in my song lyrics project.

I think this makes a really pretty friendship card.  No idea where the digi came from - it was just on my stick.  The papers are the new Princess Fairy tale papers in the SHOP.  I made a bit of a feature of the paper off cuts by weaving thme into a squarw and using it as a backing.
I still seem to be in my 'green' phase


I 'think' this is a Tiddly Inks image - it was the only one I had of a couple holding hands ;-)

I wanted to do something really special and a bit different - and I love the easel format.  All this opening a shop nonsense has sapped all my strength to play and experiment.  I can't move or try new things because of all the mess right at the time I need to be showcasing the new stock.  It WILL all come out right in the end - every one is just going to have to cope with all the muddle while I find myself again.

Yours
kitten xx


 Yours
kitten xx

Friday 20 April 2012

SHOP

Got the keys - whoop - whoop
Not sure it's hit home yet!
Wanna see?

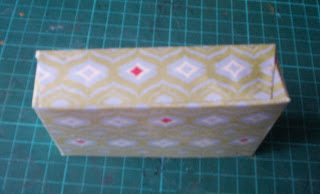
The old goat measures up for my new desk.  The shop space is about 12' deep and 10' across.  Huge window front with a little raised display area in it
There is a darling little fire place - which we hope to restore eventually. the walls are all rough clad plaster - which is wonderful - with original exposed wooded beams. I am going to take all the batons off the wall and repaint them white and leave them plain. 

 The ceilings are soooo high - we guess about 20" - but it seems well insulated and seemed quite cosy inside.


Beside the front door is a run of plain wall - here will go our slat wall and the book cases


There is a small passage way - which will eventually become the space where painting and wall art will be displayed


And beyond that is a tiny little kitchen / staff / stock room.  Uck pretty mucky - needs a good scrub and coat of paint.  But there is a decent kitchen sink - and a couple of cupboards - loads of shelving - it will be fantastic


Then the old goat found a spider.  Yes - he got soooooo excited that he had a spider - said it was a really rare one in the North - and a good luck symbol.  All I could think was - IT'S A SPIDER - GET IT OUT - but he nursed it and talked to it - and put it put side


Yours
kitten xx

Thursday 19 April 2012

Shelly's Images - Beach path - show us what you got

Shelly's Blog - HERE
Shelly's Images shop - HERE


Summer is a commin' - and the beach is a calling.

Love this scene - you could use it for so many occasions
 So this a free week and we can do what we like so I used this for the next line of the 'somewhere song' - remember?

Loads of hot colour paper layers and some bunting that swings about on the front - don't we just wish that was the view from the garden?


Do join us with this weeks challenge on the BLOG

Yours
kitten xx

Do You Stack Up? #68 - Stripes

Welcome back for another round of fun! Did you guys have fun with the glitter challenge last week? It's time for another challenge and we're creating with Stripes.

We have three amazing sponsors this week:

£10 voucher

Winner's Choice of 5 Digis

A "Toodle Club Membership" and a free Toodle Birthday Calendar.
  • Only 3 entries per person per Challenge.
  • Make sure to link back to this challenge and mention it on your blog in your blog post.
  • No back linking.
  • Entries that do not fit the requirements will not be eligible for Winner or Top 3.
  • Mr. Linky closes at 2pm on Wednesdays.
Don't you just Love that inspiration image this week - it's called wool bombing.  Where you fill a space with knitted / crochet bits and bobs.  We are doing this in Kendal - we are going to decorate all the lamp posts with knitted bands.  How much fun is that?

Following my very 'girlie' run lately - I just had to have this one for the guys.

The image is with Lili of the Valley
 - and the paper is yonks old - added the ribbon scraps just as a bit of fun - and to add to the 'stripes' them


Yours
kitten xx

Wednesday 18 April 2012

Scrapper's Delights

Scrapper's delights - SHOP
Scrapper's Delights - BLOG


There are always loads of little extra sentiments on Scrapper's digi stamps.  They come as a zip file with loads of bits and bobs.  I don't very often really use them - but I had a bit if an idea.

I made gift tags in my Word program - and I feel so smug with myself

This is what I did.

Open your Word (or other text) program.  The reason I used Word is that there are already set shapes that you can insert with out drawing them.

Insert a shape - what ever you want

Use the - insert a text box feature to create a box inside the tag shape
then - from inside your text box - use insert a picture to add your text.

Then you make the text box line 'no colour' - or a fancy line.

You can easily fiddle about with size and angles to get the look you want

Then - print onto your card stock - and you can still colour and decorate to make it personal

I know this is very basic and simple - but we all have to start somewhere!

Yours
kitten xx

Tuesday 17 April 2012

Tuesday - shop talk

Check out the new website for the shop


I still have to add pictures of the shop front - but is full of rubbish at the moment - and the old goat has got to make a banner for the shop site with our logo

He has done one for all the signage - the A boards and stuff
We are still waiting on solicitors - one of the clauses in the lease was wrong (in a very bad way) - so it's had to go back to the other side - and they are sooooo slow - we will be lucky to be in this month!

Yours
kitten xx

Sunday 15 April 2012

Sunday - new stamps

Although I am not a big stamper - I bought the new Micheal Powel stamps.  Mainly because I have loved his work as a cross stitcher for years - his designs are so different.

Oh - oh - oh - did I struggle - that would be a big yes then.

These are big stamps - really big and sooo full of light, sketchy detail - I kept loosing bits - and getting shadows when I over compensated with pushing and pushing.

Finally I got the look I was looking for

so - here's what I found -
- give the rubber stamp front a really good soap and water scrub with a nail brush - there seems to be some sort of coating that won't let the ink stick - and at this size - it really notices.
- even tried the upside down brayer trick - and a soft stamping pad - both hopeless.
- I tried all my ink pads - Archival worked ok - Distress was a dead loss - the best?  Marvey La Plume pens!!!!!  It could be that I really wanted to go for the pulled watercolour look in the image - but everything else was very patchy.

The words are from the musical 'West Side Story' film.  Love this song - every line is a quote in it's self.  So that got me thinking - why choose?  Do a card for every line! 

So begins a new project - all my next cards will follow the lines of the song (ish)

Love a challenge!!

PS - BIG TIP - and you head it it from kitten first - there are loads of 'scratch it' ideas starting to creep into card making - how? - - it's washing up liquid added to metallic paint! - shhhhh

Yours
kitten xx

Saturday 14 April 2012

Erica Martyn

Don't forget to pick up Erica's freebie this month - April showers - a darling little duck

I wanted to keep it more grown up and not go down the 'cutsie' road too much - why should only kids have all the cute images!


Yours
kitten xx

Friday 13 April 2012

Shelly's Images - Birthday cake chief- use cake

Shelly's Blog - HERE
Shelly's Images shop - HERE

Cake - yummie.

I had not made my mind up what colours to use - except I knew there was a cupcake border strip in the heap somewhere.  Then I opened my box of scraps up to see what I could find - and there was this wonderful pink check left over from my cow last week - yummie.

So - very pastel cupcake / sugar colours for the girls - sorry boys - will do a 'bloke' one to!

Do join us with this weeks challenge on the BLOG

Yours
kitten xx

Thursday 12 April 2012

Do You Stack Up #67 - Bling / Glitter


Good morning everyone! We hope you enjoyed last week's challenge. This week we're getting our Glitter or Bling on. So dust off your lil jars of glitter, Stickles or anything that blings :)

This week we have three sponsors:

Winner's Choice 5 Images

Winner’s Choice of 3 Images

$25 Gift Certificate

A FEW RULES
  • Our DT would love to leave comments on your blogs, please remove word verification to make this process easier (see right side bar for a how-to guide).
  • Only 3 entries per person per Challenge.
  • Make sure to link back to this challenge and mention it on your blog in your blog post.
  • No back linking.
  • Entries that do not fit the requirements will not be eligible for Winner or Top 3.
  • Mr. Linky closes at 2pm on Wednesdays.

Glitter? - I can do glitter!!!  I had this apple image from  Hope Jacare:
 - and I have to admit glitter? - apples? - ??? - then I started playing and I remembered the old folk song - and my good old Fiskers leaf shapes stencil - and there you go.

The apple 'charm' is solid glitter.  I flooded the space with 3D glaze and covered with a rich red glitter to make it stand proud and look more solid.  The leaves are cut out - embossed - inked - and then glittered.  ~The red background has a heart die cut out of it and all those white specks are silver glitter in the card stock.  Gems everywhere and a bit of holographic foil.
Yours
kitten xx