Tuesday 30 May 2017

Project Tuesday - dressing our dolly

I am not sure what this month has done - I think I have got my dates muddled - either that or I have been off in the Tardis again!

This week we are making a simple sun dress for our dolly - and just for once - considering the weather - I am spot on!!

For this project you will need a small piece of lightweight cotton - or poly cotton for the dress - and either a needle and thread or sewing machine.  You know I love to hand sew - and I find it much easier on these small projects than using a machine.

For the sleeve trim and  neck tie you can use a bit of ribbon - I wanted to try out my smallest Bias binding binding maker.  I have a set of all the different sizes and I hardly ever use the smallest  it's such fun to make your own bias!

The pattern is here - but the instructions are deliberately vague.  You have so meany options for the finishings that you can experiment with all of them in different fabric and you will have a whole new wardrobe for your dolly

This is your pattern - you will need 1 front - take notice of any pattern direction in your fabric cos you don't want an upside down pattern!


 you will need 2 back pieces - as well as the pattern direction - make sure you have one for each side - arm holes on either side!


This is a really simple pattern.  Sew up the side seams - sew up the back seam leaving about 1" at the top.  Hem the bottom of the dress.  Sew the shoulder seams.  Neaten the arm holes - either turn under a hem - trim with ribbon - or use bias binding.


Finish the neckline - either turn down a small hem - add facings - trim with ribbon - or use bias binding.  You will need a fastening at the top of some kind.  Either finish your neatening a the back seam edge and add a tiny hook / button / snap fastening - or use ribbon / bias and leave long tails so you can tie a bow


Love
kitten


www.princesskitten.co.uk.
www.thekittenandthegoat.co.uk
kittenandgoat@gmail.com

Monday 29 May 2017

Cute kitten fix

Monday is kitten's day off

and the old goat is going to the races

- so I can play


Love
kitten


www.princesskitten.co.uk
www.thekittenandthegoat.co.uk
kittenandgoat@gmail.com

Saturday 27 May 2017

Having a lazy day

Look at Alfie - out in the shop watching the world!


He is coming on so well - and everyone is being amazing with him.

Bit worried about this afternoon - the hot weather is supposed to break with thunder storms - and I have no idea how Alfie will react.  If it's rough - I am going to take him straight home where I can protect him from the noise much better - and he will feel safer.  so I am not going to get involved in anything too much just in case I have to pack up and dash off.  It has been really dead in the town - so I don't think anyone will notice anyway!


Love
kitten


www.princesskitten.co.uk
www.thekittenandthegoat.co.uk
kittenandgoat@gmail.com

Friday 26 May 2017

H-O-M-E

I finally put my new letters up on the wall - They really brighten up the dark corner


Love
kitten


www.princesskitten.co.uk
www.thekittenandthegoat.co.uk
kittenandgoat@gmail.com

Tuesday 23 May 2017

Project Tuesday - Knitted squares

This is a very subtle gentle pattern.  It looks amazing as a single pattern square blanket.

The idea behind this series is to expand your knowledge and build your confidence by tackling new techniques with small, simple projects.  Each square knits up to the same size and has the same border frame so that you can sew them together and make larger projects.  4 sewn in a square make the front of a cushion – back with another 4 squares or plain fabric.  Several in a row will make a scarf – 3 x 3 or 4 will make a baby blanket – 4 x 6 or 8 will make a lap throw - or go the whole hog and make a bed throw.  You can make each square the same pattern – you can make each square different – you can create your own design by placing the squares in a pattern – knit in 1 colour – knit the rainbow - just experiment – shout me if you get stuck – and have fun.

The squares worked in DK measure about 4 ½” square – and the larger ones 8” square.  You could use 3 strands of DK together – working on 8mm knitting needles – and the square will be bigger

You will need;
1 strand of double knitting to be worked on 4mm knitting needles – about 12g
Or 2 strands of double knitting (equal to chunky weight yarn) to be worked on 6mm knitting needles – about 20g

·         If you are using the double knitting weight of yarn, then use 2 strands together throughout.
·         If you are using the chunky weight of yarn, then use 1 strand throughout.
·         Remember to count all the rows as you work up the square.

Cast on 29 stitches.
Row 1: *(knit 1, purl 1) – repeat from * to last stitch, knit 1.
Row 2: *(purl 1, knit 1) – repeat from * to last stitch, purl 1.
Row 3: *(knit 1, purl 1) – repeat from * to last stitch, knit 1.
Row 4: *(purl 1, knit 1) – repeat from * to last stitch, purl 1.

Row  5: knit 1, purl 1, knit 1, purl 1, knit to last 4 stitches, purl 1, knit 1, purl 1, knit 1.
Row  6: purl 1, knit 1, purl 1, knit 2, purl 4, * knit 1, purl 4 – repeat from * to last 5 stitches, knit 2, purl 1, knit 1, purl 1.
Row  7: knit 1, purl 1, knit 1, purl 1, knit to last 4 stitches, purl 1, knit 1, purl 1, knit 1.
Row  8: purl 1, knit 1, purl 1, knit 2, purl 4, * knit 1, purl 4 – repeat from * to last 5 stitches, knit 2, purl 1, knit 1, purl 1.
Row  9:. knit 1, purl 1, knit 1, purl 1, knit to last 4 stitches, purl 1, knit 1, purl 1, knit 1.
Row 10: purl 1, knit 1, purl 1, knit to last 3 stitches, purl 1, knit 1, purl 1

Rows 5: to 10: form the pattern – repeat a total of 4 times
Row 29: *(knit 1, purl 1) – repeat from * to last stitch, knit 1.
Row 30: *(purl 1, knit 1) – repeat from * to last stitch, purl 1.
Row 31: *(knit 1, purl 1) – repeat from * to last stitch, knit 1.
Row 32: *(purl 1, knit 1) – repeat from * to last stitch, purl 1.
Cast off.

I use Robin double knitting 100% acrylic yarn for all my knitting work.  If you are using pure wool, or a wool mix you will need more as the yarn is heavier.

**** This is my own original work.  Use it for your own use or for charity selling.  Use it to inspire you, and to lead you on to other projects.  But, please do not resell the pattern as your own workings.  It takes me years of learning, and months of work to produce a final pattern.

The Kitten and The Goat

9, New Shambles, Kendal, LA9 4TS


Love
kitten


www.princesskitten.co.uk
www.thekittenandthegoat.co.uk
kittenandgoat@gmail.com

Monday 22 May 2017

Cute kitten day

Monday is kitten's day off


Love
kitten


www.princesskitten.co.uk
www.thekittenandthegoat.co.uk
kittenandgoat@gmail.com

Saturday 20 May 2017

Saturday Art Day

You know - I am sure someone creeps in and steals a day here and there.  I have been chasing my tails about all week and I am still massively behind with what I want to do.

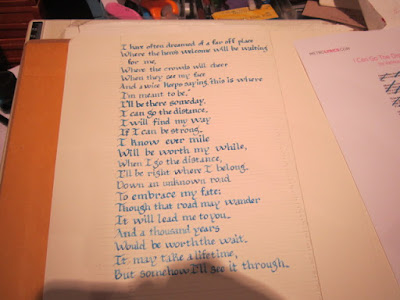
Anyway I thought I would take a bit of a break this afternoon to do a bit of simple practice.  This is one of my favorite songs - not sure if I should really admit that - but  I love it.


I have to keep stopping every few lines and take a rest.  Blooming nuisance - but that's where we are now.  It's such a shame the weekend is brewing up to be grotty - I could really use some lovely warm sunshine.

Love
kitten


www.princesskitten.co.uk
www.thekittenandthegoat.co.uk
kittenandgoat@gmail.com

Friday 19 May 2017

Huge great chopper


Well it is! - It's a butcher's cleaver in remembrance of the original purpose of the ally (Shambles were ware the butchers gathered together).  The council has had 2 of these made - one for each end of the alley to help us stand out a bit.  There are no butchers in the alley now - the last guys retired last month.

We have also had new sign board added each end of the alley walls - and the hodgepodge jumble mess of the old signs has been cleared away and the entrances refurbished.


I rather like it - it is much cleaner and neater.  There are 2 empty spaces - the butchers shop is empty (hopefully in the process of being sold - so it won't be empty long) - and Alex in the Polish shop is hoping to move to bigger premises down the way a bit.

The town square is also having a bit of a makeover.  It will take much longer than normal though because of the market - they keep having to stop and clear away so the stalls can set up.  They are supposed to be putting in a pretty paving area and several new benches.

I upcycled the boards I had on the end that were removed and put them on the shop front - you can't waste them can you? 


The goat repainted them for me and put the logos on properly and then screwed them to the shop front.  They are covered during the day with the table and display - but they show at night and when we are closed so I can put stuff on them.


Love
kitten


www.princesskitten.co.uk
www.thekittenandthegoat.co.uk
kittenandgoat@gmail.com

Tuesday 16 May 2017

Project Tuesday - wires

I promised to give you a basic breakdown of wire thickness used in jewellery making.  So here we go
There are many different thicknesses of jewellery wire, and the sizes are referred to as the ‘gauge’. 

The first thing I want you to remember is that the smaller the gauge number, the thicker the wire. As you can see, 10 gauge wire is pretty big (about 2.6mm in diameter) and 28 gauge wire is very very tiny (about 1/3 of a millimeter in diameter). 

Gauge 10 - 2.59mm - rings, cuffs, necklets - very hard to work with
Gauge 12 - 2.03mm - rings, bangles, heavy duty structure work
Gauge 14 - 1.63mm
Gauge 16 - 1.29mm - a nice thick wire to work with - perfect for sturdy clasps, heavy jump rings and structure work.
Gauge 18 - 1.02mm - as a 16 gauge - can also be used for earwires and connecting chunkier beads and wrapped loops - as well as chainmaille work
Gauge 20 - 0.813mm - perfect for ear wires and beaded chains.
Gauge 22 - 0.635mm - good for making beaded chain with small holed beads - the thickest wire for wire wrapping.
Gauge 24 - 0.508mm - too fine for jump rings or support work - use with tiny hole beads - good for wire wrapping and weaving
Gauge 26 - 0.455mm - great for wire wrapping and weaving
Gauge 28 - 0.320mm - great for wire wrapping and weaving, knitting and crochet and more delicate work
Gauge 30 - 0.254mm - too delicate for wrapping - not suitable for structure work - best for knitting, weaving, crochet
Gauge 32 - 0.203mm

Hope that helps a bit


Love

kitten


www.princesskitten.co.uk
www.thekittenandthegoat.co.uk
kittenandgoat@gmail.com

Monday 15 May 2017

Cute kitten day

Monday is kitten's day off


Love
kitten


www.princesskitten.co.uk
www.thekittenandthegoat.co.uk
kittenandgoat@gmail.com

Saturday 13 May 2017

Saturday Art Day

I have had a much better week this week.  Alfie has slept well every night - and he has been much better at going out for his wees.  So with the extra rest - and the lovely sunshine we have had all week - it doing me the world of good.

On my cupboard clearing out kick I found a set of letters that I made ages ago.  The used to hang in the kitchen before I had the centre wall unit put in.  I thought I would put them up in the living room - there is a perfect space for them beside the curtains - but then I thought I would jazz them up a bit. My style has evolved over the years and I like loads of layers.

The letters were originally cut from foam board - 3 or 4 layers I think - about 1" thick.


Love
kitten


www.princesskitten.co.uk
www.thekittenandthegoat.co.uk
kittenandgoat@gmail.com

Tuesday 9 May 2017

Project Tuesday - knitted square - Squares

Love this one - so delicate!!


The idea behind this series is to expand your knowledge and build your confidence by tackling new techniques with small, simple projects.  Each square knits up to the same size and has the same border frame so that you can sew them together and make larger projects.  4 sewn in a square make the front of a cushion – back with another 4 squares or plain fabric.  Several in a row will make a scarf – 3 x 3 or 4 will make a baby blanket – 4 x 6 or 8 will make a lap throw - or go the whole hog and make a bed throw.  You can make each square the same pattern – you can make each square different – you can create your own design by placing the squares in a pattern – knit in 1 colour – knit the rainbow - just experiment – shout me if you get stuck – and have fun.

The squares worked in DK measure about 4 ½” square – and the larger ones 8” square.  You could use 3 strands of DK together – working on 8mm knitting needles – and the square will be bigger

You will need;
1 strand of double knitting to be worked on 4mm knitting needles – about 12g
Or 2 strands of double knitting (equal to chunky weight yarn) to be worked on 6mm knitting needles – about 20g

·         If you are using the double knitting weight of yarn, then use 2 strands together throughout.
·         If you are using the chunky weight of yarn, then use 1 strand throughout.
·         Remember to count all the rows as you work up the square.

Cast on 29 stitches.
Row 1: *(knit 1, purl 1) – repeat from * to last stitch, knit 1.
Row 2: *(purl 1, knit 1) – repeat from * to last stitch, purl 1.
Row 3: *(knit 1, purl 1) – repeat from * to last stitch, knit 1.
Row 4: *(purl 1, knit 1) – repeat from * to last stitch, purl 1.

Row  5: knit 1, purl 1, knit 1, purl 1, knit to last 4 stitches, purl 1, knit 1, purl 1, knit 1.
Row  6: purl 1, knit 1, purl 1, knit 2, purl 4, * knit 1, purl 4 – repeat from * to last 5 stitches, knit 2, purl 1, knit 1, purl 1.
Row  7: knit 1, purl 1, knit 1, purl 1, knit to last 4 stitches, purl 1, knit 1, purl 1, knit 1.
Row  8: purl 1, knit 1, purl 1, knit 2, purl 4, * knit 1, purl 4 – repeat from * to last 5 stitches, knit 2, purl 1, knit 1, purl 1.
Row  9:. knit 1, purl 1, knit 1, purl 1, knit to last 4 stitches, purl 1, knit 1, purl 1, knit 1.
Row 10: purl 1, knit 1, purl 1, knit to last 3 stitches, purl 1, knit 1, purl 1

Rows 5: to 10: form the pattern – repeat a total of 4 times
Row 29: *(knit 1, purl 1) – repeat from * to last stitch, knit 1.
Row 30: *(purl 1, knit 1) – repeat from * to last stitch, purl 1.
Row 31: *(knit 1, purl 1) – repeat from * to last stitch, knit 1.
Row 32: *(purl 1, knit 1) – repeat from * to last stitch, purl 1.
Cast off.

I use Robin double knitting 100% acrylic yarn for all my knitting work.  If you are using pure wool, or a wool mix you will need more as the yarn is heavier.

**** This is my own original work.  Use it for your own use or for charity selling.  Use it to inspire you, and to lead you on to other projects.  But, please do not resell the pattern as your own workings.  It takes me years of learning, and months of work to produce a final pattern.

The Kitten and The Goat

9, New Shambles, Kendal, LA9 4TS


Love
kitten


www.princesskitten.co.uk
www.thekittenandthegoat.co.uk
kittenandgoat@gmail.com

Monday 8 May 2017

Cute kitten day

Monday is kitten's day off


Love
kitten


www.princesskitten.co.uk
www.thekittenandthegoat.co.uk
kittenandgoat@gmail.com
Tuesday 2 May 2017

Project Tuesday - key fob kit

Something a bit different to wet your sewing buds.  I have used this fun little technique to make a bag charm - but  you can use the same trick with all sorts of fabrics to make decals and hangers - detail to add to bunting - make tiny ones in Christmas fabric to add to the tree.  The method is below - and on my website - the complete kits are in the shop - while they last


You will need:
8” x 8” patterned fabric
8” x 8” contrast fabric
1 x fancy button
1 x key ring or bag fob
Thread sharp needle
Pins
Short piece of ribbon


1 – cut a 7” diameter circle from each of the patterned and contrast fabric.
2 – with the right sides together- ¼” in from the outer edge stitch around the circles – leaving a 2” gap to turn.
3 – before turning – clip around the curved raw edges to help it sit flat.
4 – turn fabric right side out and press well.
5 – top stitch around close to the edge all around the circle to close the gap.


6 – with the contrast side on the inside
– fold the circle in half and mark the edge crease with a pin or pencil.
- fold these marks together and mark the edge crease with a pin or pencil.
7 – bring 2 opposite marks together and over sew a couple of times to join – do not break the thread.  Place the join in the centre of the circle.


8 – bring in one of the other marks to the centre – and over sew a couple of times
- bring in the last mark and secure to the centre.  Do not break the thread.


9 – open up each petal in turn so that it sits flat and fold the point over the base corner into a ‘collar’ shape.
10 – Add a fancy button to the centre.
11 – loop the ribbon through the fob and sew on to the inside of one of the corner.


Love
kitten


www.princesskitten.co.uk
www.thekittenandthegoat.co.uk
kittenandgoat@gmail.com

Monday 1 May 2017

Cute kitten day

Monday is kitten's day off

Well that's another month gone!


Love
kitten


www.princesskitten.co.uk
www.thekittenandthegoat.co.uk
kittenandgoat@gmail.com